 Material Add Flat Plate Layout
See on another page: Multi-Sided Flat Plate Material window.
- Step-By-Step
- Tips and Tricks
- Related Tools
1 . Click the Material Add Flat Plate Layout icon, which is pictured above. The icon can be found on the Material page > Add section. Select a member you want to add the material to.
▸ Preselect a Member to enable the Members contextual page and click the Material Add Flat Plate Layout icon found in the Materials/Components section.
Alternative: Invoke Material Add Flat Plate Layout using the Find Tool by searching the command name and clicking the icon, which is pictured above.
Learn more about alternative methods for launching commands.
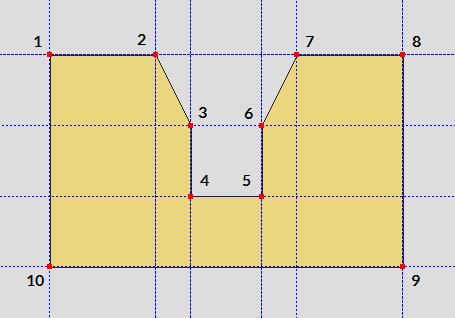
2 . The status line prompts, "Locate Layout". Locate - Pan - Cancel mouse bindings become active. The Locate contextual page becomes active. Select the appropriate Locate option, then place work points as shown below. The following illustration shows work points for a multi-sided flat plate laid out in a plan view.
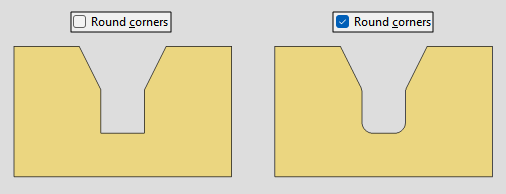
2a : Corner rounding options appear on the Locate contextual page. As you left-click (Locate) to define points, remember to set corner rounding for the most recently located point before you left-click (Locate) to define the next point. Below is an example of a multi-sided flat plate with and without corner rounding.
2b (optional) : If you accidentally left-click (Locate) at a point you do not want, hold down Shift and left-click (Remove) to remove that point. You can remove as many points as you like, then continue locating points as described in 2a.
2c : Middle-click (Complete) with your mouse pointer anywhere in the view to locate the final point exactly where you placed the starting point, or left-click on the starting point to finish locating the layout.
3 . The status line prompts, "Locate material dimension reference point". After you have located the reference point, the Multi-Sided Flat Plate Material window opens.
3a : "Material thickness" and "Steel grade" and "Thickness reference point" and "Surface finish"and "Color" and "Checkered" are filled out with default settings that match the last multi-sided flat plate that you added or edited in your current Modeling session. If you did not previously add or edit such a plate, default settings populate the window. Press the "OK" button when you are done with the settings in this window.
Alternative : Press "Cancel" to end the command and stop the multi-sided flat plate material from being added to the model.
4 . The Rotate Material window opens, and a preview of the new multi-sided flat plate is shown on screen. Do one (1) of the following:
Alternative 1:To accept the material's present rotation, press the "OK" button.
Alternative 2 : Change the material's rotational settings and then press "OK" if you want to rotate the material.
Alternative 3 : Press "Cancel" to cancel the command and stop the material from being added to the model.
5 . After pressing "OK" on the Rotate Material window:
Alternative 1: If the material was added to a member without like members, the material is added to the model and the command ends.
Alternative 2: If the material was added to a member with like members, the Material Add -- Options window appears and gives you the option to add the material to like members. After making your choice here and clicking OK, the material is added to the model and the command ends.
- Multi-sided Flat Plate Material window
- Plate layout miscellaneous member
- Plates (Topic)
- Add Miscellaneous Member
- Miscellaneous Member Edit window (general settings and related topics)
- Miscellaneous Steel (default misc. member types)
- Legacy Miscellaneous Member Edit window
- Settings on material windows for Add Legacy Miscellaneous Member
- Legacy Miscellaneous Steel (legacy misc. member types)
- Altering a legacy miscellaneous member's main view

